cold-vibes

Loading

IT

Autoriser l’exécution de Scripts PowerShell

powershell2

Sommaire []

I. Présentation

Par défaut, la configuration de Windows ne permet pas l’exécution de Scripts PowerShell même si la console est bien présente dans les dernières versions d’OS de Microsoft. Surement dans un soucis de sécurité, et pour ne pas rendre possible l’exécution de ces scripts sur l’utilisateur n’en a pas l’utilité.

Pour autoriser l’exécution des scripts PowerShell sur votre machine, il suffit de modifier la politique de sécurité appliquée en terme d’exécution des scripts.

II. Les 6 modes de sécurité différents

– Restricted : Cette valeur qui est la valeur par défaut, empêche l’exécution de scripts.

– AllSigned : Requiert la signature numérique par un éditeur de l’ensemble des scripts, y compris ceux que vous créez en local sur la machine.

– RemoteSigned : Requiert la signature numérique par un éditeur des scripts téléchargés à partir d’internet.

– Unrestricted : Exécute tous les scripts, mais vous invite à autoriser l’exécution des scripts non signés téléchargés via internet.

– Bypass : Pas de blocage, ni d’avertissements, tout sera exécuté.

– Undefined : Supprime la stratégie d’exécution appliquée, mais pas dans le cas où elle est définie par une stratégie de groupe.

III. Exécutez la console PowerShell

Cliquez sur “Démarrer” puis saisissez “powershell“, faites clic droit sur “Windows PowerShell” et cliquez sur “Exécuter en tant qu’Administrateur” pour disposez des privilèges suffisants permettant de modifier le système. Si vous utilisez un système 64 bits, les deux versions de la console apparaîtront.

powershell3

IV. Politique actuelle

La politique de sécurité actuelle doit être “Restricted” qui est la valeur par défaut sous Windows, pour vérifier cela, saisissez la commande PowerShell suivante :

Get-ExecutionPolicy

V. Modifiez la politique

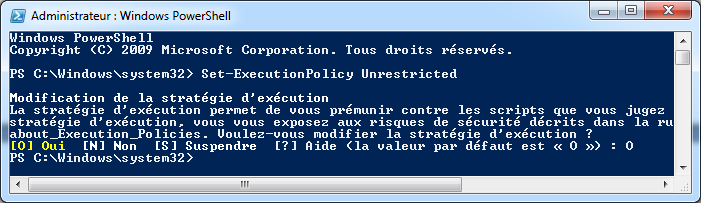
Pour pouvoir exécuter des scripts il faut impérativement modifier la politique de sécurité, choisissez le mode qui vous semble le mieux approprié à ce dont vous avez besoin. Pour ma part je choisis le mode “Unrestricted” pour pouvoir exécuter les scripts tout en gardant un minimum de sécurité.

Utilisez la commande suivante :

Set-ExecutionPolicy Unrestricted

Lorsqu’on vous demande de confirmer la modification, indiquez “O” pour Oui et appuyez sur Entrée.

powershell2
IT

Comment activer le webservice de Woocommerce ?

– Dans “Réglage > Permaliens”, cocher “Titre de la publication” : 

Création du webservice et de la clé API 

Rendez-vous dans “WooCommerce > Réglage > Avancé > API REST” puis “Ajouter une clé”.

Renseignez les champs et l’utilisateur que vous avez précédemment créé ou choisi d’utiliser, n’oubliez pas de modifier les droits en “Lecture/Écriture”.

Générez la clé API.

Vous avez maintenant votre webservice et vos 2 clés (Client et Secret client) que vous devez fournir à Vaisonet pour la configuration du E-Connecteur.

Félicitation, vous avez activé le webservice de votre WooCommerce.

IT

Allowed memory size of 134217728 bytes exhausted (tried to allocate 20480 bytes) in WordPress

This error means is that your site requires more memory than the default allocated memory provided by your server.

Solve this by increasing the PHP memory limit.

Update WP-Config

Edit the wp-config.php file on your WordPress site.

Copy this to the bottom of the file:

define( 'WP_MEMORY_LIMIT', '256M' );

This tells WordPress to increase the PHP memory limit to 256MB.

Update .HTACCESS

Edit the .htaccess file on your WordPress site.

Paste the following code before the line that says #END WORDPRESS.

php_value memory_limit 256M

This tells WordPress to increase the PHP memory limit to 256MB.

Update PHP.INI

Alternatively you can update PHP.INI to increase the memory limit. Find your PHP.ini file and look for this:

                                                                                                                                                                                                                                                                                                                                                                                                                                                                  ; Maximum amount of memory a script may consume                                                                                                                                                                                              ; https://php.net/memory-limit                                                                                                                                                                                                               memory_limit = 256M 

After updating, restart Apache.

IT

Cockpit TCP Port and Address

Cockpit systemd SocketSELinux PortFirewalld Port

Cockpit’s cockpit-ws component is configured by default to accept connections on port 9090. This is the port that is documented for a “Web-based System Manager” to listen on. It is also relatively memorable.

However there are many reasons you may wish to change the default port. For example other software may use port 9090 or you may wish to setup Cockpit to listen on 443 instead. It is also possible to have Cockpit only listen on one specific IP address.

Note that it is only required to have Cockpit listening on a TCP port on the server that you access with your web browser. If you add multiple servers with host switcher, Cockpit will connect to those servers via ssh.

The systems that Cockpit runs on are typically locked down with firewalls, SELinux, so changing the default port is not as easy as editing a configuration file.

Cockpit systemd Socket

On servers with systemd Cockpit starts on demand via socket activation. To change its port and/or address you should place the following content in the /etc/systemd/system/cockpit.socket.d/listen.conf file. Create the file and directories in that path which not already exist. The ListenStream option specifies the desired address and TCP port.

[Socket]
ListenStream=
ListenStream=443
[Socket]
ListenStream=
ListenStream=7777
ListenStream=192.168.1.1:443
FreeBind=yes

NOTE: The first line with an empty value is intentional. systemd allows multiple Listen directives to be declared in a single socket unit; an empty value in a drop-in file resets the list and thus disables the default port 9090 from the original unit.

The FreeBind option is highly recommended when defining specific IP addresses. See the systemd.socket manpage for details.

In order for the changes to take effect, run the following commands:

$ sudo systemctl daemon-reload
$ sudo systemctl restart cockpit.socket

SELinux Port

If SELinux is protecting your server, then you will need to tell it to allow Cockpit to listen on the new port. Run the following command to do so. The last argument specifies the desired TCP port.

$ sudo semanage port -a -t websm_port_t -p tcp 9999

If the port is already defined by some other part of the SELinux policy, then you will need to use the -m argument to modify the definition. That’s the case with the 443 SSL port, which is typically defined as an http_port_t port.

$ sudo semanage port -m -t websm_port_t -p tcp 443

The changes should take effect immediately.

Firewalld Port

If Firewalld is configured as your firewall, then you will need to tell it to allow Cockpit to receive connections on the new port. Run the following commands to do so. The last options specify the desired TCP port.

$ sudo firewall-cmd [--zone=ZONE] --add-port=443/tcp
$ sudo firewall-cmd --permanent [--zone=ZONE] --add-port=443/tcp
IT

Clean Up the WinSxS Folder

This topic is about the different ways to reduce the size of the WinSxS folder on a running Windows 10, or later, installation.

Don’t delete the WinSxS folder, you can instead reduce the size of the WinSxS folder using tools built into Windows. For more information about the WinSxS folder, see Manage the Component Store.

The operating system automatically reduces the size of the WinSxS folder by using methods similar to the ones described in this topic. Windows also uses internal processes to reduce the size of the WinSxS folder, such as uninstalling and deleting packages with components that have been replaced by other components with newer versions. Previous versions of some components are kept on the system for a period of time, allowing you to rollback if necessary. After a period of time, these older components are automatically removed from the installation.

You can also reduce the size of a Windows image using some of the same techniques, as discussed in Reduce the Size of the Component Store in an Offline Windows Image.

To learn about finding the size of your WinSxS folder, see Determine the actual size of the WinSxS folder.

 Note

Microsoft strongly recommends not disabling component cleanup. Component cleanup is essential for maintaining optimal system performance and freeing up disk space by removing outdated or unnecessary system files, such as old Windows Update files. Disabling this feature can lead to the accumulation of unnecessary files, which can consume valuable disk space and potentially impact system performance.

 Warning

Deleting files from the WinSxS folder or deleting the entire WinSxS folder may severely damage your system so that your PC might not boot and make it impossible to update.

  You have a number of ways to start the cleanup of the component store, which use a combination of package deletion and component compression to clean up the WinSxS folder:

Task Scheduler

The StartComponentCleanup task automatically cleans up components when the system isn’t in use. When run automatically, the task will wait at least 30 days after an updated component has been installed before uninstalling the previous versions of the component.

If you choose to run this task, the task will have a 1 hour timeout and may not completely clean up all files.

Run the StartComponentCleanup task in Task Scheduler to clean up and compress components

  1. If Task Scheduler is not open, start the Task Scheduler. For more information, see Start Task Scheduler.
  2. Expand the console tree and navigate to Task Scheduler Library\Microsoft\Windows\Servicing\StartComponentCleanup.
  3. Under Selected Item, click RunWindows Command PromptCopyschtasks.exe /Run /TN "\Microsoft\Windows\Servicing\StartComponentCleanup"  NoteThe StartComponentCleanup task can also be started from the command line.

Dism.exe

The /Cleanup-Image parameter of Dism.exe provides advanced users more options to further reduce the size of the WinSxS folder. For more information, see DISM Operating System Package Servicing Command-Line Options.

Use the /StartComponentCleanup parameter

  • Using the /StartComponentCleanup parameter of Dism.exe on a running version of Windows 10 or later gives you similar results to running the StartComponentCleanup task in Task Scheduler, except previous versions of updated components will be immediately deleted (without a 30 day grace period) and you will not have a 1-hour timeout limitation.From an elevated command prompt, run:Windows Command Prompt
  • Dism.exe /online /Cleanup-Image /StartComponentCleanup

Use the /ResetBase switch with the /StartComponentCleanup parameter

  • Using the /ResetBase parameter together with the /StartComponentCleanup parameter of DISM.exe on a running version of Windows 10 or later removes all superseded versions of every component in the component store.From an elevated command prompt, run:Windows Command Prompt
  • Dism.exe /online /Cleanup-Image /StartComponentCleanup /ResetBase  WarningAll existing update packages can’t be uninstalled after this command is completed, but this won’t block the uninstallation of future update packages. 

Disk Cleanup

You can use Disk Cleanup to reduce the number of unnecessary files on your drives, which can help your PC run faster. It can delete temporary files and system files, empty the Recycle Bin, and remove a variety of other items that you might no longer need. The option to cleanup updates helps reduce the size of the component store.

Run Disk Cleanup to delete system files

To delete system files run the steps as provided in Delete files using Disk Cleanup.

IT

Configure Windows Server to query an external NTP Server

The steps below can be used to configure a windows server or desktop computer to query an external NTP server such as pool.ntp.org.

Step 1: Info

This is generally performed on DCs in an Active Directory domain. Then all workstations use AD to get time from the DCs. This could also be used on a non-DC windows machine to be your NTP server for your network that you point to for all of your switches/routers and various other devices.

Again, it doesn’t have to be a DC, but it makes sense for it to be, as it’s not very resource intensive.

Step 2: Elevated prompt

Open the command prompt as administrator.

You could also use a PowerShell prompt instead of command prompt if you want.

Step 3: Stop the time service

net stop w32time

Step 4: Set the manual peer list external servers

w32tm /config /syncfromflags:manual /manualpeerlist:“0.be.pool.ntp.org,1.be.pool.ntp.org,2.be.pool.ntp.org,3.be.pool.ntp.org

Step 5: Set the connection as reliable

w32tm /config /reliable:yes

Step 6: Start the time service back up

net start w32time

Step 7: Test the configururation

w32tm /query /configuration

and

w32tm /query /status